GigaPaw.com participates in affiliate programs including Amazon Associates. We earn from qualifying purchases. Content is for informational purposes only—consult a licensed veterinarian for pet medical advice.
17 DIY Cat Window Ideas That’ll Make Your Cat Forget You Exist
Your cat has been staring at that window for the last three hours straight. No blinking. No moving. Just… staring.
And honestly? They deserve better than a 4-inch windowsill that barely fits one paw.
Whether you want to build a full outdoor window box (a “catio,” if you will), hang a cozy hammock, set up a padded window seat, or install a cat door so your furry dictator can come and go on their own schedule, this guide has you covered.
Let’s get into it.
Why Your Cat Needs a Window Setup (Like, Yesterday)
Cats are hardwired to watch things. Birds, squirrels, that one leaf blowing across the yard. It’s basically Netflix for them.
Indoor cats especially benefit from window enrichment because it reduces boredom, stress, and those 3 AM zoomies that make you question every life choice you’ve ever made.
A window perch (Browse cat window perches on Amazon), hammock, or catio gives your cat mental stimulation, warmth from the sun, and a front-row seat to the greatest reality show on earth: the outdoors.
Plus, a tired cat who spent the day bird-watching is a cat who actually lets you sleep at night. Win-win.
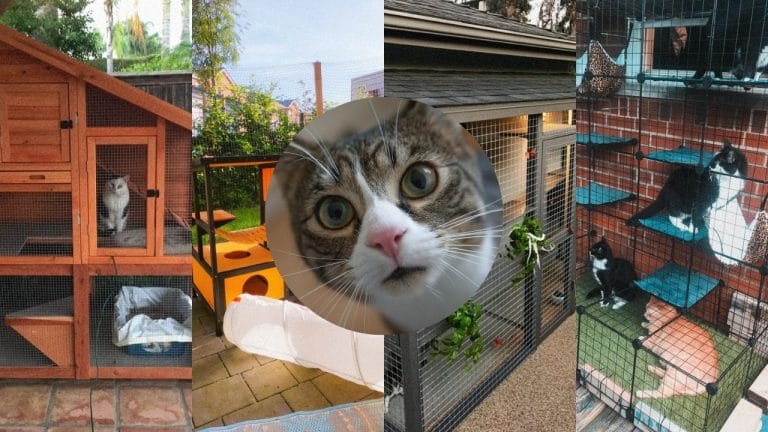
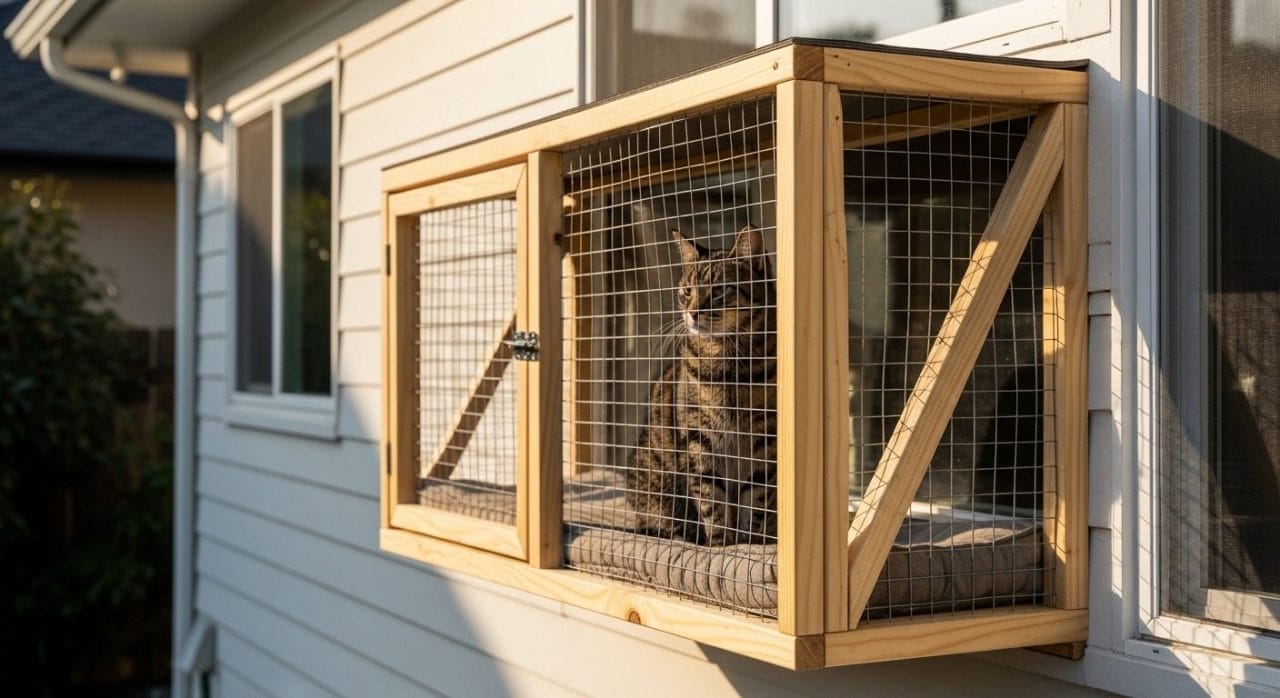
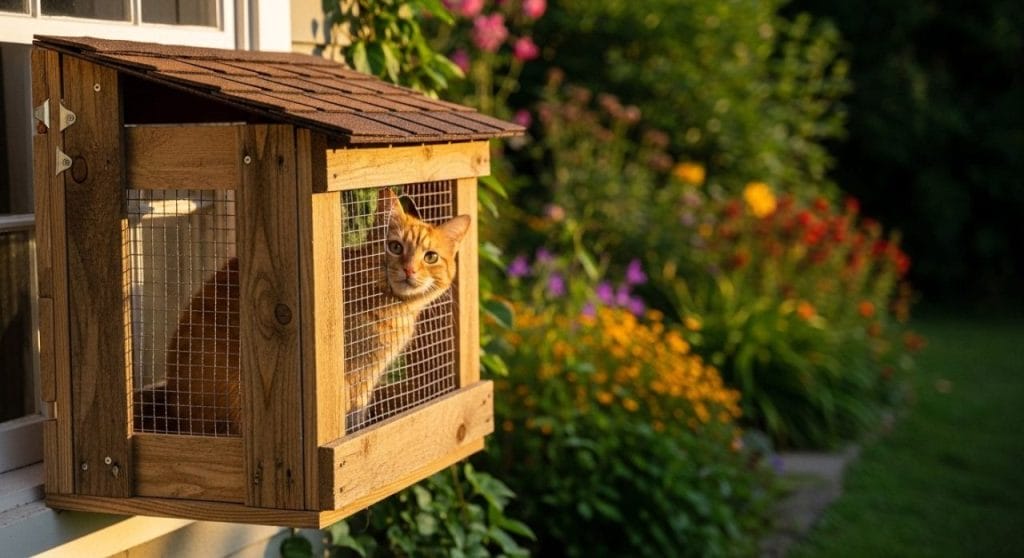
DIY Cat Window Box Ideas (Outdoor Catios)
A window box catio is basically a screened-in balcony for your cat that attaches to the outside of your window. Think of it as a tiny apartment with a view.
The Classic Wood-and-Wire-Mesh Window Box
This is the most popular DIY catio design, and for good reason. You build a 3-sided wooden frame, cover it with wire mesh or hardware cloth, and mount it outside your window with angle braces (like how you’d mount an air conditioner bracket).
What you need:
- 2×2 lumber for the frame
- Hardware cloth or galvanized wire mesh
- Angle support braces
- Plywood for the floor (weather-resistant)
- Polycarbonate panel or wire mesh for the roof
- Wood screws, drill, measuring tape
Most people can knock this out in a weekend. The frame sits outside the window, supported by braces secured to your house, and your cat accesses it through the open window or a cat door insert.
Cost: roughly $50-150 in materials, depending on size and whether you already have tools.
The Amazon Box Quickie Catio
Not a joke. One popular tutorial uses an actual Amazon shipping box, some tape, and contact paper to create a temporary indoor window box. It takes about 10 minutes.
Is it fancy? No. Does it work? Surprisingly, yes.
This is perfect if you want to test whether your cat even cares about a window box before you invest real money and a Saturday afternoon.
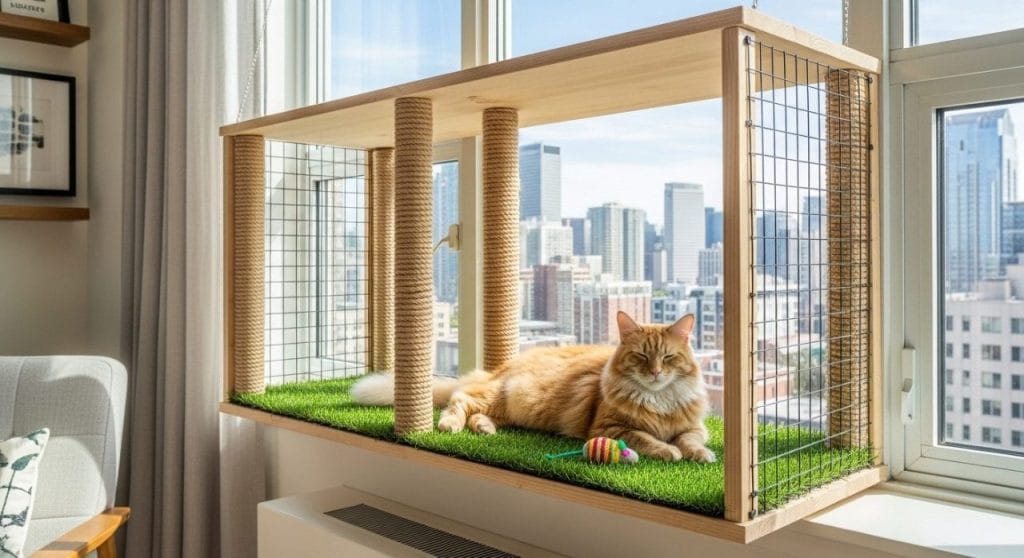
The IKEA Bookshelf Hack
Take an IKEA bookshelf, add rope, wire fencing, and a strip of grass turf, and you’ve got yourself a spacious window box that doubles as a small cat playground.
The beauty here is that you don’t need serious carpentry skills. If you can follow IKEA instructions (debatable for most of us), you can build this.
“An IKEA bookshelf hack turned into a cat window catio, with rope-wrapped posts, wire fencing sides, a strip of green grass turf on the floor, a ginger cat lounging inside next to a small toy, placed against a bright window, modern apartment interior, lifestyle photography”
The Pallet Wood Catio
Got access to free pallets? You’re basically halfway there.
Use pallet wood for the floor and frame, add hardware cloth for the sides, and shingle the roof with standard roofing materials. One blogger built a full window box catio from pallets for under $30 in additional materials.
Pro tip: Sand down pallet wood before building. Nobody wants splinters, especially not your cat.
Quick Comparison: Window Box Catio Styles
| Style | Difficulty | Cost | Best For |
|---|---|---|---|
| Classic Wood & Wire | Medium | $50-150 | Permanent setups |
| Amazon Box | Easy | $0 | Testing the concept |
| IKEA Hack | Easy-Medium | $40-80 | Non-handy people |
| Pallet Wood | Medium | $20-50 | Budget builders |
| Pre-made Kit | Easy | $150-400+ | People who hate DIY |
Cat Window Hammock Ideas
If a full catio feels like overkill, a window hammock is the sweet spot between “doing nothing” and “building a tiny house for my cat.”

The Macrame Plant Hanger Hammock
This one blew up on TikTok, and I totally get why. You take a macrame plant hanger, hang it from a hook on the wall near your window, drop a basket in the center, and add a cushion.
That’s it. Your cat now has a swinging hammock with a view.
Just make sure the hook is anchored into a stud. A macrame hanger holding a 12-pound cat that suddenly decides to launch itself at a passing bird needs serious support.
The PVC Pipe Hammock
This is the classic DIY approach. You build a rectangular frame from PVC pipe and corner joints, stretch durable fabric across it, and mount it to the wall or window frame.
What you need:
- 4 straight PVC pipe sections
- 4 PVC corner joints
- Heavy canvas or outdoor fabric
- Industrial suction cups with hooks (or wall screws)
- Rope or chain for hanging
The fabric cradles your cat like a little burrito, and you can swap it out for washing whenever it gets too hairy. Which will be immediately.
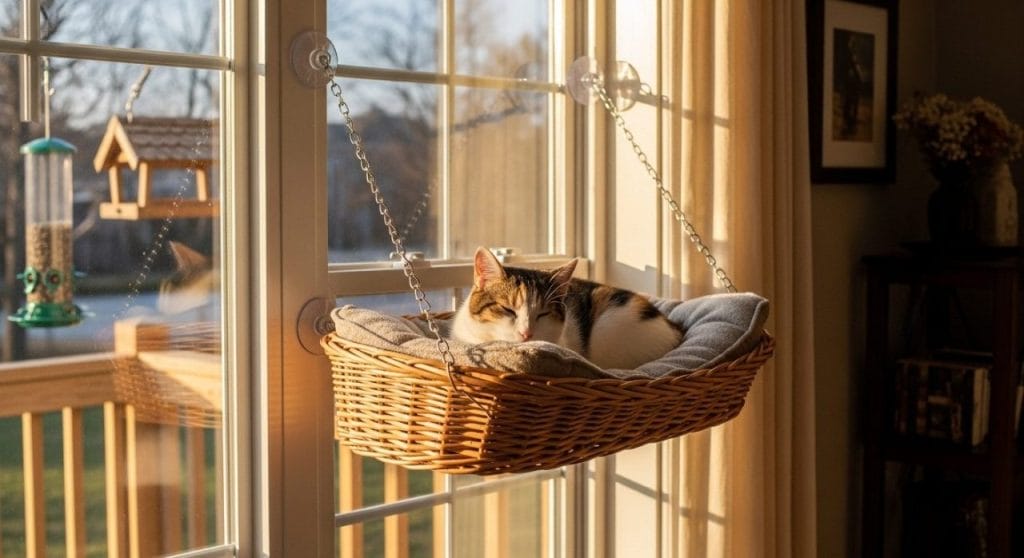
The Wicker Basket Window Hammock
Grab a shallow wicker basket, some heavy-duty suction cups, a short chain, and a pillow. Attach suction cups to the window, hang the chain, and rest the basket inside.
Reddit users swear by this setup, but they also warn: clean your window glass thoroughly before attaching suction cups, and check them regularly. There’s nothing quite like the sound of a cat crashing to the floor at 2 AM because a suction cup gave up.
The Ladder Hammock
Got an old wooden ladder? Lean it against the wall near a window, wrap the rungs in sisal rope (Get cat-safe sisal rope on Amazon) (instant scratching post), and hang a fabric hammock between two rungs.
It’s rustic, it’s functional, and your cat gets to feel like a pirate in a ship’s rigging. Sort of.
Window Hammock Tips That Actually Matter
Weight matters more than you think. Most suction cup hammocks claim to hold 30-50 pounds, but real-world Reddit feedback says they start getting sketchy around 15-20 pounds, especially in humid conditions or on textured glass.
If your cat is over 15 pounds, skip suction cups entirely and go with a hammock that screws into the window frame or wall studs. Your cat (and your sanity) will thank you.
Cat Window Seat Ideas
A window seat is less “hanging bed” and more “solid platform.” These are great for cats who prefer a firm surface and tend to be… let’s say… generously sized.
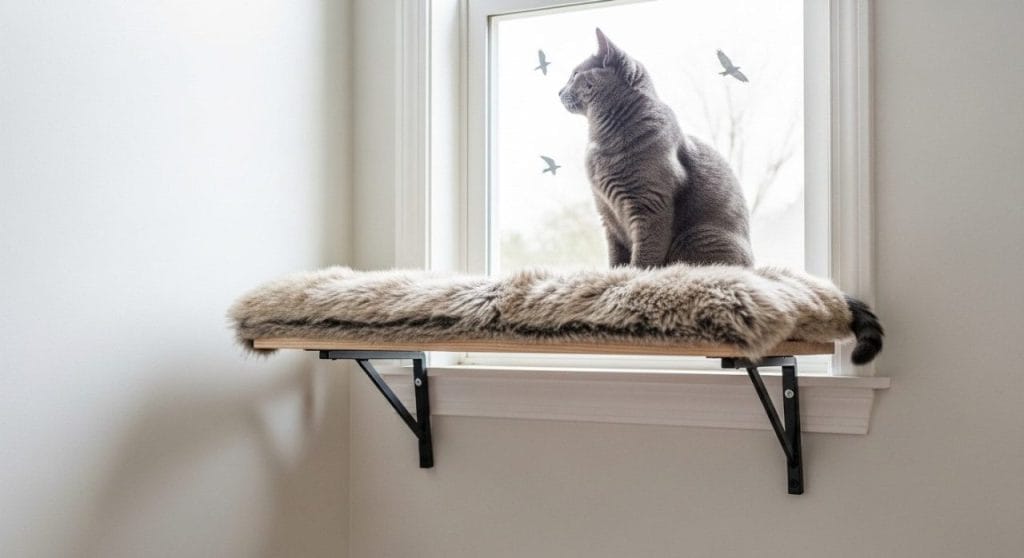
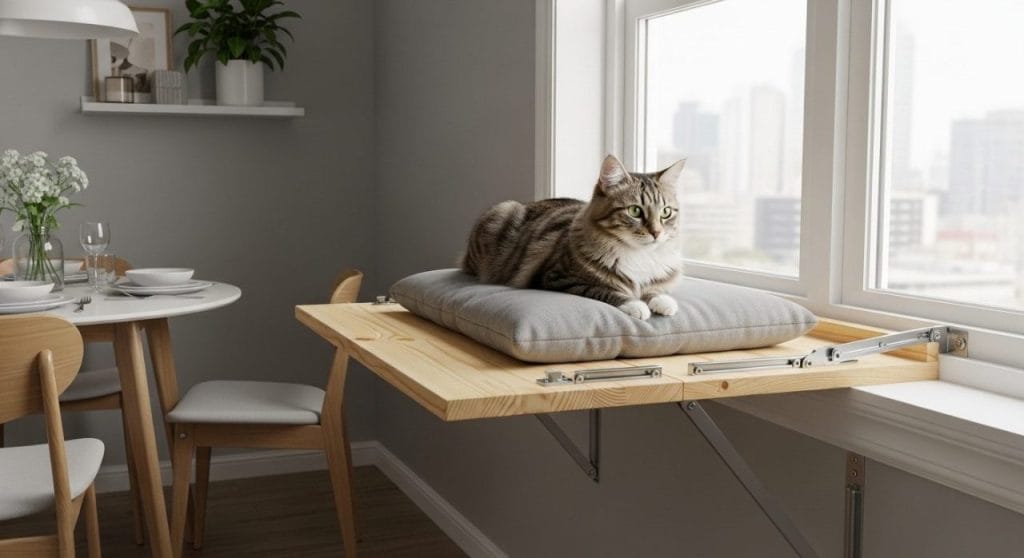
The Shelf Bracket Window Perch
This is the simplest build on this entire list. A flat piece of wood, two shelf brackets, and some screws.
Mount the brackets below the windowsill, attach the wood on top, add a cushion, and you’re done. Total project time: maybe 30 minutes.
One DIY blogger drove a single nail through the perch into the windowsill for extra stability, then covered it with a cushion. Easy to patch later if you remove it.
The Repurposed Serving Tray Perch
Take an old wooden serving tray, sand it down, line the inside with decorative paper or fabric, mount it on shelf brackets below your window, and add a small cushion.
Some people even attach little dangling catnip toys from eye screws underneath. Your cat gets a perch AND entertainment. Overachiever.
The Flip-Down Window Seat
This is genius for small spaces. Build a shelf with folding brackets (using piano hinges) so it folds flat against the wall when you have company.
Your cat gets a window seat during the day, and you get your dining room back at night. Everybody wins.
The Repurposed Bar Stool Window Seat
Got an old bar stool collecting dust? Cut a new seat from plywood, cover it in faux fur with a staple gun, and place it in front of your cat’s favorite window.
The height of a bar stool is usually perfect for standard window placement. Add some jute wrapping around the legs, and you’ve got a scratching post built right in.
The Corner Window Perch
If you have two adjoining windows that form a corner, cut a triangular piece of plywood, mount it on hidden wall brackets, and add a weatherproof cushion.
Your cat gets a panoramic view, and the corner angle creates a cozy nook that feels protected. Cats love feeling tucked in while still being able to survey their kingdom.
Window Seat Pro Tips
Always test weight limits with at least a 20-30% safety margin. If your cat weighs 12 pounds, make sure the setup can comfortably hold 15-16 pounds.
Pick a window that gets good sunlight but isn’t opened and closed constantly. The constant movement will either loosen the mount or annoy your cat. Possibly both.
Add a bird feeder outside the window. This is the cheat code. Your cat will be glued to that perch for hours.
Cat Door for Window Ideas
Okay, so you’ve built the catio or outdoor perch. Now your cat needs a way to get to it without you playing doorman every 20 minutes.
A cat door window insert is the answer, and it’s way easier to install than you think.
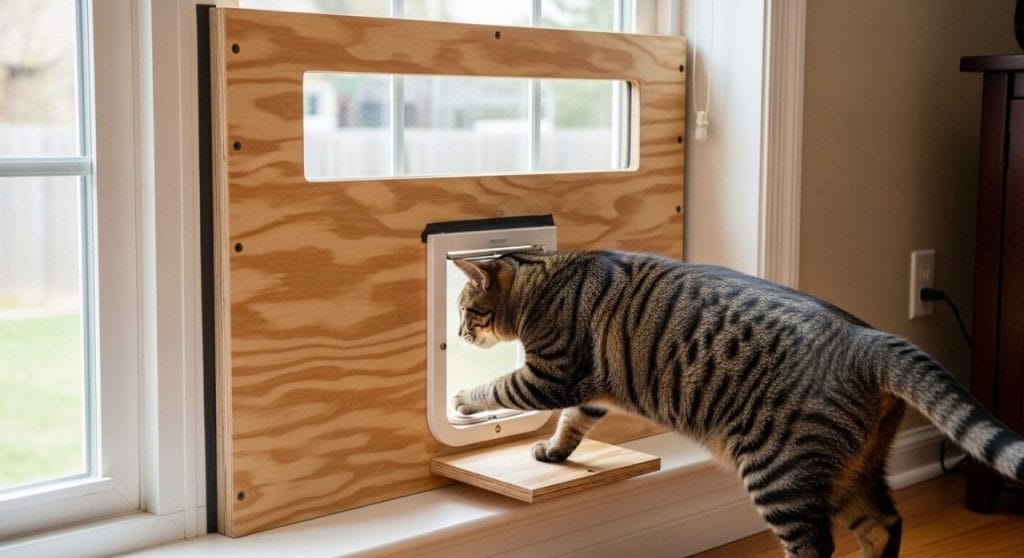
The Plywood Sandwich Insert
This is the most popular DIY cat door for windows, especially for double-hung (vertical sliding) windows.
How it works: You cut a piece of plywood to fit in the open window gap (like where an air conditioner insert would go), cut a hole in the plywood, and install a standard cat flap in the hole. Add a glass pane above the flap for light, and seal everything with weather stripping.
One Instructables user built this for under $30, and it took about 1-2 hours. The insert pops in and out of the window easily, making it perfect for renters.
Security tip: Wedge boards against the far edge of the window to prevent it from being opened further. This adds stability and deters intruders.
The Polycarbonate Panel Insert
Instead of plywood, use a clear polycarbonate panel. It lets light through, looks cleaner, and is just as easy to cut.
Measure your window track width, cut the polycarbonate to fit, install the cat flap, and slide it into the window track. Use foam or weather stripping for a tight seal.
Cost: under $50. One blogger built this for a horizontal sliding window and reported no air leakage.
The XPS Foam Insert (Renter’s Dream)
This is wild but actually brilliant. You build a window insert entirely from extruded polystyrene foam (the pink or blue insulation boards from the hardware store).
Glue 3 layers of half-inch foam together, cut to fit, install the cat flap, and optionally add small glass panes (dollar store picture frames work great).
The insulation value is actually better than most commercial inserts, and the whole thing costs maybe $20-30. Plus, zero permanent modifications to anything.
The 3D-Printed Cat Door
If you have access to a 3D printer, you can print a custom cat door frame that fits into your window screen instead of the glass. This means you don’t even have to mess with the window itself.
Great for renters since you can just replace the screen if you move out.
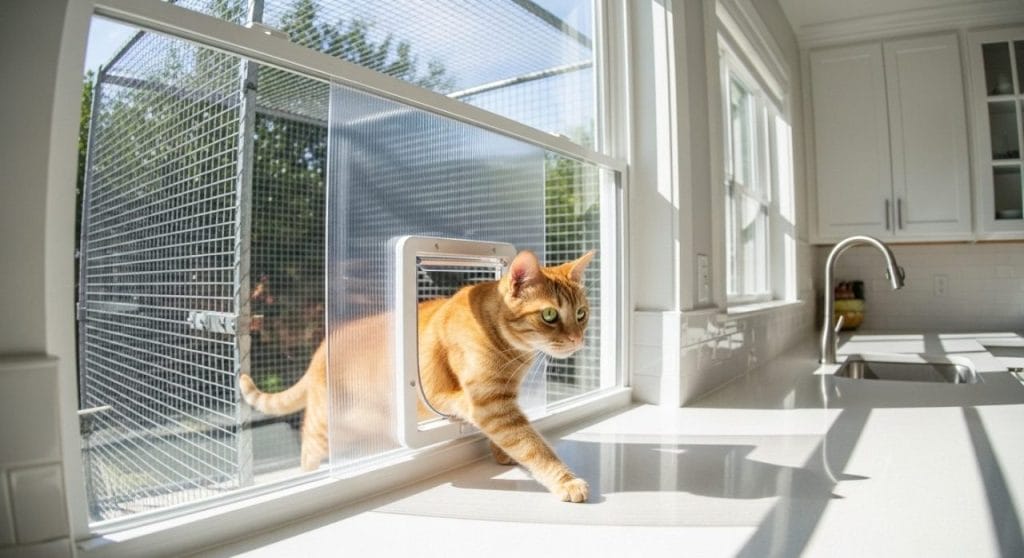
The Compression Cat Door
This isn’t a full DIY, but it’s worth mentioning. Compression-fit cat doors sit between the bottom of the window and the window sill, similar to how a window air conditioner unit installs. No cutting, no drilling, no permanent changes.
They run about $80-250 depending on the brand, but the zero-modification installation makes them worth every penny for apartment dwellers.
Cat Door Comparison
| Type | Cost | Difficulty | Best For |
|---|---|---|---|
| Plywood Sandwich | $20-40 | Easy | Double-hung windows |
| Polycarbonate Panel | $30-50 | Easy | Sliding windows |
| XPS Foam Insert | $20-30 | Easy | Best insulation, renters |
| 3D Printed | $10-20 | Medium | Screen doors, renters |
| Compression Fit (store-bought) | $80-250 | Super Easy | Zero-modification needs |
Safety Stuff You Can’t Skip
Look, I know safety sections are boring. But your cat trusting you with their life from a window perch is not the time to cut corners.
- Always anchor into wall studs when possible. Suction cups fail. Drywall anchors can pull out. Studs don’t care.
- Check suction cups weekly. Temperature changes, humidity, and even just time can weaken the seal. Better to catch a loose cup than to hear the crash.
- Use weather-resistant materials for outdoor catios. Untreated wood rots. Regular fabric mildews. Cedar or pressure-treated lumber and outdoor-grade mesh will last for years.
- Make sure your cat can’t escape. For outdoor window boxes, use hardware cloth with openings no larger than 1×1 inch. Cats are liquid. They will find a way through anything bigger.
- Never install a cat door above the first floor without an enclosed landing area. This should be obvious, but just in case: cats can jump, but they can’t fly.
So Where Do You Start?
If you’ve never built anything in your life, start with a simple window seat using shelf brackets. It’s 30 minutes, costs almost nothing, and your cat will be obsessed.
If you’re handy and want the full experience, go for a wood-and-wire window box catio with a cat door insert. It’s a weekend project that your cat will use every single day for years.
And if you’re somewhere in between, a PVC pipe hammock or wicker basket perch hits the sweet spot of effort versus reward.
The point is: do something. Your cat is sitting on that tiny windowsill right now, pretending to be okay with it, but secretly judging you. Hard.
Go build them something awesome.